|
|
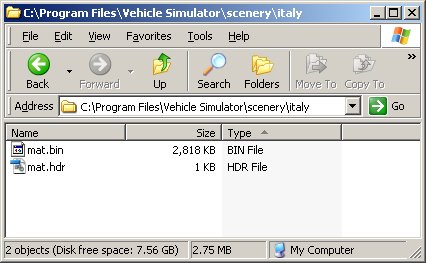
Creating a new sceneryAny scenery in Vehicle Simulator is based upon a digital elevation matrix of the selected area. This area can be obtained by downloading DEM or SRTM data from
the internet and saved using a program called 3DEM To download 3DEM and topographic data see this website The matrix should be exported from 3DEM using "Save Terrain
Matrix" and selecting "Binary Signed Integer" as the format.
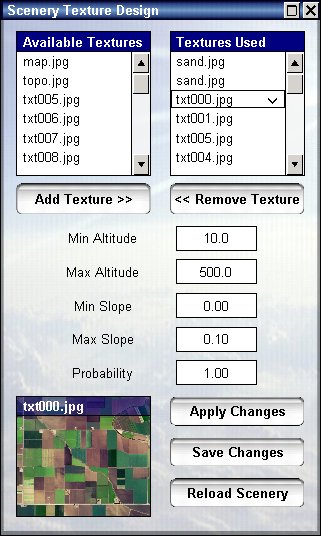
Start the program and move into this scenery by selecting "Move To Point" from the map view, this will place you inside the scenery and you will be able to design and customize it. Texture DesignEach scenery is composed of a number of textures, up to eight different textures can be used. Each texture is placed on the scenery by a set of rules which can be customized, the result can be very elaborate and forms a non repeating pattern that resembles a realistic photographic texture. Select Design Textures from the main menu, the following screen will appear:
Here you can see the textures that comprise the scenery, each scenery is applied when a set of conditions is met, if conditions are not met the following texture in the list is checked until one is found, these conditions are:
The elevation is given in meters and is the elevation of each point on the ground. The slope is given in radians, and is measured as the change of elevation divided by change of position along the ground. The probability is a number between 0 and 1 when 1 mean that every time
conditions are met this texture is applied, and 0 means that even is conditions
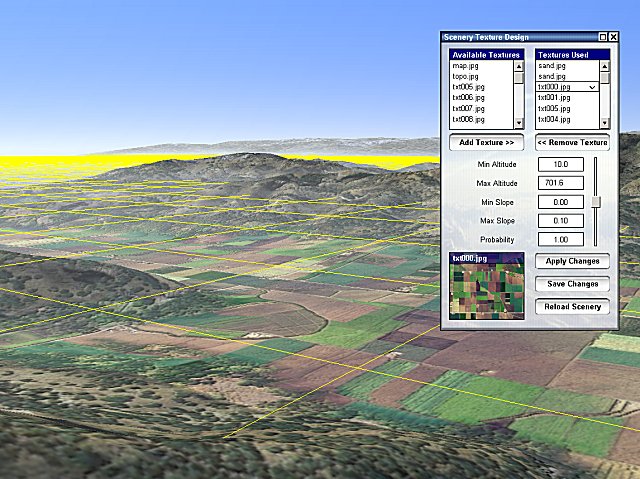
are met this texture is never applied. You can edit these conditions changing the elevation and slope and pressing "Apply Changes" to see the result, when changing elevation you will see a yellow grid showing you the elevation you selected visually, for example here is the selection of forest texture:
On the right side you can see a list of available textures, these textures are placed inside the "graphics" directory of the program and you can place there any texture you want in jpg format. To add a texture to the list of textures used, select the texture from the right side and press "Add Texture", to remove a texture select it from the left side and press "Remove texture". When creating snow that require cliffs show through, always place the snow before the cliffs and let its maximum slope be small ( 0.2 for example ) so that cliffs will be applied if slope is bigger than the snow. When you are happy with the result you can press "Save Changes", if you wish to cancel the changes you can press "Reload Scenery". The result of your work is saved inside a file called "scenery.txt" which also includes vegetation information for the textures you have placed, see below more on customizing vegetation. By default scenery can be changed, however scenery can be copyright protected, if you wish to protect your scenery edit the scenery.txt ( see notes inside ) Each texture you use, can have a dense texture associated, this dense texture
is shown when the camera gets near the ground, and has similar name to the
texture used with the addition of "dense", for example txt000.jpg has
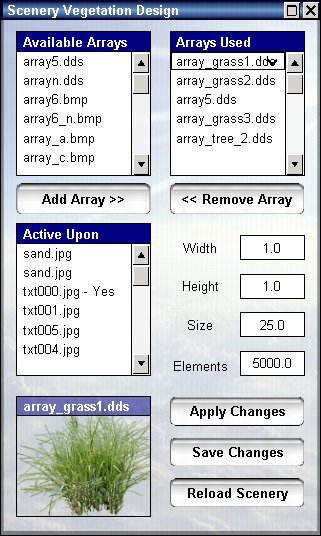
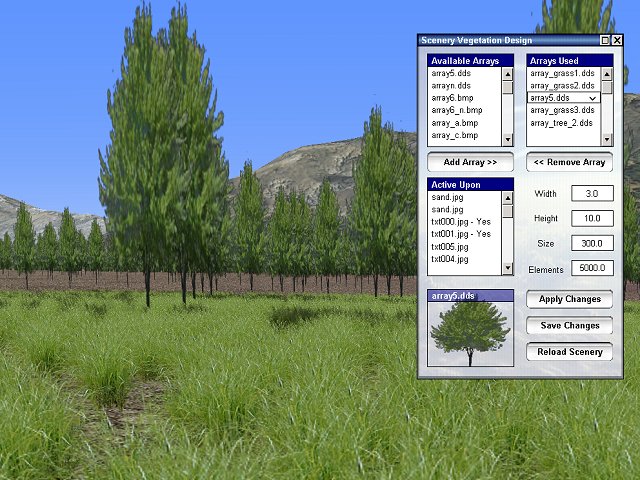
"dense_txt000.jpg" as a dense texture. Vegetation DesignEach scenery can have up to 64 types of vegetation, each type has specific width, height, size and number of elements which appear when camera is close to the ground. Each type can be shown upon any ground texture you choose, combinations of vegetation types can be used to create forests with grass for example. Select Design Vegetation from the main menu, the following screen will appear:
On the right side you can see a list of available textures, these textures are placed inside the "common" directory of the program and you can place there any texture you want in JPG, BMP or DDS format. To add an array to the list of textures used, select the texture from the right side and press "Add Texture", to remove a texture select it from the left side and press "Remove texture". For each array you select its width ( width of single element ), height ( height of single element ), size ( maximal distance from camera ) and number of elements. Each array can exist upon on or more of the ground textures in the scenery, to select which textures to show upon, select them on the lower list on the right. You can edit these conditions changing the properties and pressing "Apply Changes" to see the result, for example here is the selection of forest with grass:
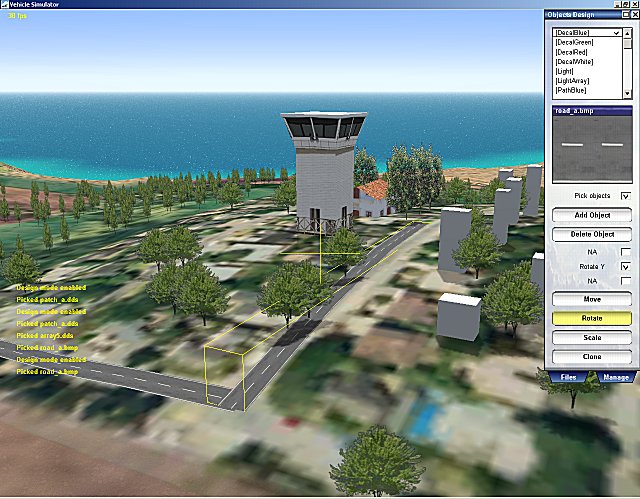
The result of your work is saved inside a file called "scenery.txt" which also includes texture information for the textures you have placed, see above more on customizing textures. Arrays can be made active underwater if you make them active upon the first texture of the scenery, which is the sea bottom texture. User Objects DesignYou can create and place individual objects wherever you wish in the scenery, these objects are loaded when closer than object visibility distance, defined in land settings above. Select Design Objects from the main menu, this will show one of the three design screens, these screens are then accessed using the tabs below them.
The Object Design screen on the left, is responsible for adding and customizing objects, to add an object select it from the upper list and then look at the point you wish to add it, a yellow crosshair marks the point this object will be added, these press "Add Object". This object is then selected, and you can move it or change its size and other dimensions, to move in all dimensions allow the three checkboxes to be selected, to move in a single dimension allow only one of them to be selected, for example having moved an object in X,Y,Z you wish to raise it above the ground, select the Y only, and then drag it it. Scaling and rotation may be used to change other properties as well, in that case the name of property will appear instead of X,Y,Z and you can see the value change as you drag the mouse. Each object type can have different properties set, for example ordinary objects can have scale, roads can have width, length, curve and angle, arrays can have width, height, elements and area, etc... Objects have many types and sometimes a different day and night appearance, see the website for more information about this. To delete an object select it by picking visually on it, and then press "Delete Object". Multiple objects can be selected by using Shift + Mouse move +
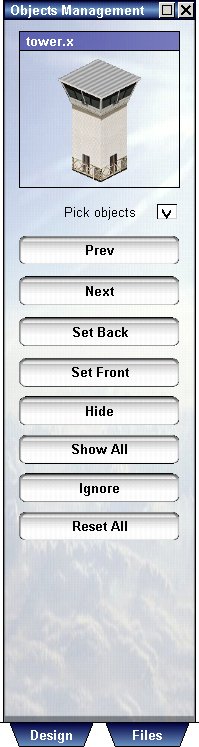
left mouse button to select a window of objects. Object ManagementSelecting specific objects can be tricky sometimes, especially if objects appear one on top of the other, as buildings upon a surface, or individual trees among building etc.. Use the object management screen for this purpose, using this screen you can pick individual objects, hide or show them, add them to a list of ignored objects or reset them to normal status. When surfaces are created, you can also select which surface or object to draw first and which to draw last, using the Set Front and Set Back, this allows you to have complicated surfaces with objects and other surfaces upon them. To modify an object select it by picking upon it, and then change its properties using the management screen. Multiple objects can be selected using Shift + Mouse move + left mouse button, this slects a group of objects inside the selection window, any action done on a single object is done also on a group of objects when selected. To deselect the objects click on any position free of other objects.
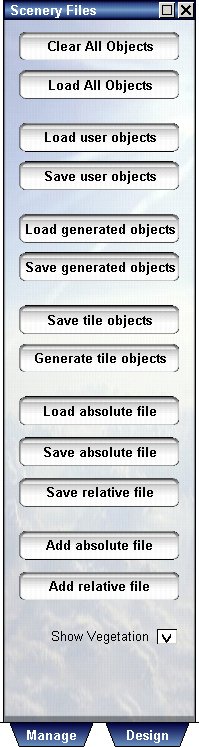
Scenery FilesVehicle simulator scenery consists of two types of objects, objects which
were made by the user on specific positions, and objects that are generated by
the program. User ObjectsCreate some objects with the object design screen, then open the Scenery Files screen and press "Save User Objects", this saves the objects you have made into a file called "objects.txt" inside the scenery directory, this file contains a list of objects to be added on a specific position. If you wish to duplicate your objects, or use them as a group, press "Save Relative File" and select a name for this group of objects, for example "misc_objects", this will save your objects relative to the camera position. Now, you can add groups of this type in any location you wish, to do so press "Add Relative File" and select the "misc_objects" you have created, this group of objects will be added at the new camera position. This procedure can be used to create villages, and towns, these groups are not movable once added, only individual objects in them can be changed. You can also design the scenery in pieces, adding one part at a time, for this you can create objects and save them with "Save Absolute File", this saves the objects you made in their original positions, and you can later integrate all the groups you have made by pressing "Add Absolute File". Your goal should be to design scenery in groups and pieces and integrate it at the end, so that the objects.txt file will contain the groups only, and each group will contain the details. Generated ObjectsEach texture you used for the ground can have objects associated with it, these objects will appear on places relative to this texture, for example if you used a texture with farms and forests, you can actually define farms and forests the appear on them. These objects are generated whenever the texture is used, and therefore are called generated objects, you can select which of these to keep in case you need to customize some areas of the scenery. To create generated objects for a specific texture, clear all objects first,
then position your camera above the texture you wish to work upon.
Then press "Save Tile Objects" and this will create a text file with the same name as your texture. You can repeat this process for other textures as well, and create each file for each texture, when happy with these files, press "Generate Tile Objects" and this will create the file called "auto_objects.txt". Press "Load Generated Objects" to see objects generated in this file, note that each group of objects is now repeated whenever this texture appears. You can customize the generated objects by deleting the ones you do not need and then press "Save Generated Objects". Ground textures and vegetation textures are stored inside the
graphics directory, model files and associated textures are stored inside the
common directory.
|