
This option is available only while the situation is loaded, select it from the main menu or press "O" see the graphic settings, these include three subcategories: water ,Land and others.
A good understanding of these settings is essential for using the program to it's maximum potential, please read this section carefully.
Press the "Water" tab to show the water settings, this will show the following screen:

On the upper left corner you will find the sea surface settings, these select how to render the sea and which graphic options to use.
Rendering a realistic looking water can be a very demanding task on your CPU and video card, for some situations it is best not to use waves, but to show ripples only, for example using the program for flight simulation does not require animated water in most cases, but water animation may be required when you fly close to the water or land upon water.
Reflection and refraction require some heavier computations, as they require the program to render the land and objects more than once.
In order to speed up the rendering, water settings are used when altitude is low enough to appreciate them, at higher altitude the water becomes more simple and default to ripples and next to shaded surface very high.
Foam is formed on water when waves are used and wind and wave swelling are large enough, the roughness and wave shape of water surface can be adjusted using the "Wave Swelling" and "Water Bump" sliders.
These are the available sea modes:
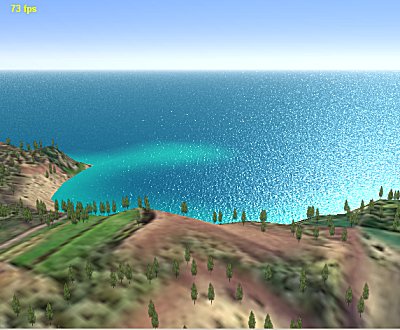
Shaded ( no waves ) :This is the fastest and the default mode of rendering for the sea surface, suitable for flight and general sea visualization. Adjust the wave length and water bump to change the appearance of water in this mode, the tones of water are determined by the depth of bottom and the color of the sea. |
 |
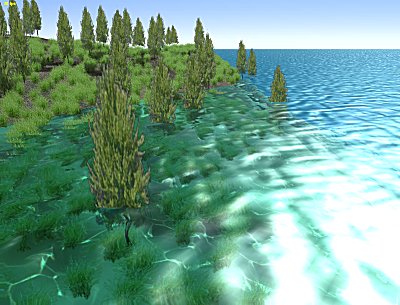
Refraction ( no waves) :One of the best looking water modes, require more processing power to render, to make objects appear in refraction enable "Objects in Refs". To see caustics above and below water enable "Show Caustics". Adjust the wave length and water bump to change the appearance of water in this mode, the color of water is determined by the color of the sea. |
 |
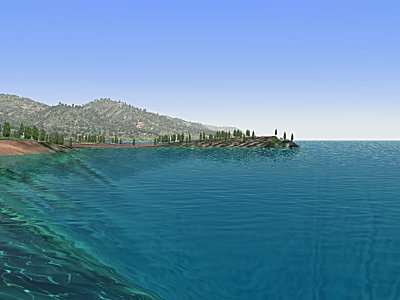
Reflection + Refraction ( no waves ) :This is the most realistic and demanding sea mode, suitable for shallow waters and relatively calm sea. To see caustics above and below water enable "Show Caustics". Adjust the wave length and water bump to change the appearance of water in this mode, the color of water is determined by the color of the sea. |
 |
Shaded with waves:This mode is best suitable for simulating ships and seaplanes, refraction and reflection can be used as well, but realism is adequate when shaded is used. Adjust the wave length, wave swelling and water bump to change the appearance of water in this mode, the color of water is determined by the color of the sea. |
 |
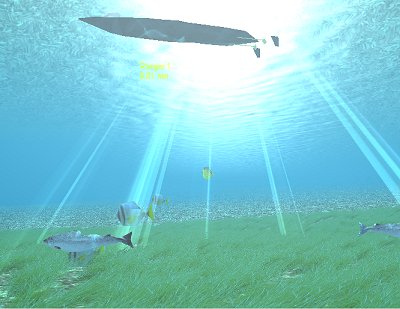
The view underwater:Using all these sea modes will of course effect the underwater view as well, basically underwater view is dominated by the reflection of underwater view on the surface of the water, so the most realistic views underwater will be the last two modes above, using refraction will also allow you to see a "fish eye" view of above water view. Select "Show Caustics" to enable caustic lighting on the bottom, and also show god rays. |
 |
In addition to setting the sea mode, you can adjust the color of the sea. use the three sliders to adjust the color by red, green and blue.
Wave are rendered more densely close to the camera, depending upon the
number of polygons used for rendering the waves.
You can control the number of these polygons by using the "Wave Polygons"
slider.
Wave swelling controls the shape of the waves, no swelling will make the
waves very smooth, while high swelling will make them choppy and breaking.
Water bump controls the intensity of water ripples, this is the main control for
the sea without waves.
Wave length provides additional control over wave shape, use longer waves to
create long swells, and shorter waves to make ordinary wind driven waves.
The basic wave height is set in the weather dialog.
Water level adjusts the level of water in the entire scenery, water of
different elevation is not possible.
Any water level may be set, slide the slide over and over again until the
desired level is set.
Underwater visibility set the maximal viewing distance underwater.
Show Caustics is used to show caustics on sea bottom and objects, and also to show the god rays emanating from the sun.
The underwater settings, are found in the middle of the water dialog, you can select the type and complexity of the sea bottom you wish to see, and also the properties of the water.
Vehicle Simulator supports underwater scenery, when such scenery exists, the
objects underwater will be shown with caustics as well.
Marine life can be added to make the view more alive, rocks, plants and
particles ( or little bubbles ) can be shown by the program even if not defined
in the scenery itself.
The program creates by default particles, rocks and plants using standard textures read from the scenery, and allows you to adjust their size and density, the five sliders on the right side of this dialog control these settings.
Press the "Land" tab to show the land settings, this will show the following screen:
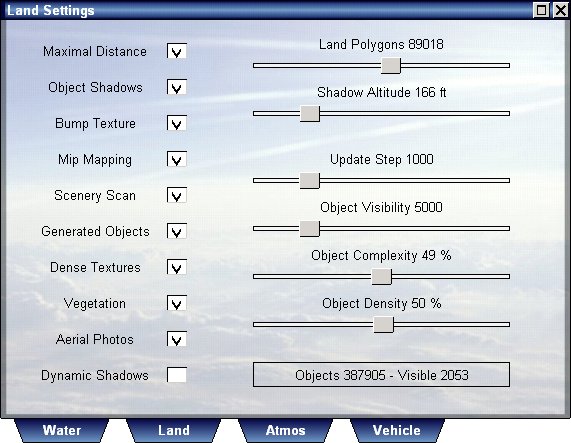
This dialog adjusts the appearance of land and the objects upon it.
Maximal Distance, adjusts the land so that it appears dense even at a great distance from camera, the disadvantage of this is that when you rotate the camera the land has to be calculated again to maintain this high level of detail, turn this option off if you want to fly or rotate your view quickly.
Object Shadows, causes objects to cast shadows, these shadows are seen on vegetation and on dense land textures, if none of these is enabled the shadows will not be seen.
Bump Texture, makes the land textures appear sharper due to pre calculated bump applied on them, this method is faster than applying bump continuously but requires the land to be re calculated when time of day changes by at least two hours.
Mip Mapping, allows the land textures to be reduced in size far from camera while maintaining the same visual appearance.
Scenery Scan, allows the program to check if scenery has changed and load new
one, based upon the geographic coordinates at camera position.
Use this option always unless you wish to navigate away from scenery borders and
prevent the scenery from being unloaded.
Generated Objects, these objects are generated automatically by the program and appear relative to ground texture, see object design for more information about creating and changing these objects, turn this option off if you wish to see a clean scenery with highest possible frame rates.
Dense Textures, these are the textures that appear as you go near the ground, upon these textures shows are drawn and vegetation appears, these textures greatly increase the visual experience close to the ground, however are computationally heavy as they use pixel shaders.
Vegetation, are arrays of plants or trees that are generated by the program and occluded upon objects or roads, greatly increase the visual experience close to the ground, computationally heavy, as they include tens of thousands of elements, turn off when high frame rate close to the ground is required, see object design for more information about creating and customizing vegetation.
Aerial Photos, each scenery can have one or more areas of photorealistic textures defined, these are defined inside the scenery files, and override the default land texture and vegetation, whenever defined, these photos enhance the realism of the scenery, but can be turned off to allow the default generated texture to appear instead.
Dynamic shadows sets high refresh rate of land shadows, showing trees moving with wind and moving vehicles, however this can reduce frame rate because of the additional rendering required.
Land Polygons, are the number of polygons rendered for the land, you can increase this number to make land appear more dense far from camera, or turn on "Maximal Distance" at the expense of speed of rendering.
Shadow Altitude, is the altitude at which shadows and dense textures begin to appear, you can adjust this value to make land appear more dense close to the ground.
Object Visibility, is the maximum distance for which user defined objects or generated objects are visible, the greater it is the slower rendering will become.
Object Complexity, controls the density of arrays of all types, vegetation and user defined, increasing will make scenery appear more dense at the expense of rendering speed.
Object Desnsity, controls the amount of automatic objects to be rendered, since the number of these objects can be very big, loading and rendering times may be long, you can reduce these times by reducing the number of objects rendered.
Update Step, controls the distance between object loading points, when distance travelled is greater than update step, the program releases far objects and load new objects, the greater the distance the more you can fly without delays, however this will increase the time required to load objects as more objects need to be updated.
Press the "Other" tab to show the other settings, this will show the following screen:

Show Thermals, this option allows you to see thermals, even ones at a great
distance from the camera.
there is a more sophisticated way to see thermal activity and more, and that is
to see the flow field.
The flow field, is a unique Vehicle Simulator feature which allows you to see the flow field around the camera, points of rising air are visualized as red lines, while sinking air is drawn as blue lines, the length of these lines is proportional to the air speed at this point.
Using this dialog you can show or hide this field, change its density, and
size around camera position.
Interesting atmospheric effects can be see using this filed, like the
doughnut shaped thermal flows, cloud updrafts and micro bursts, ridge
effects and more.
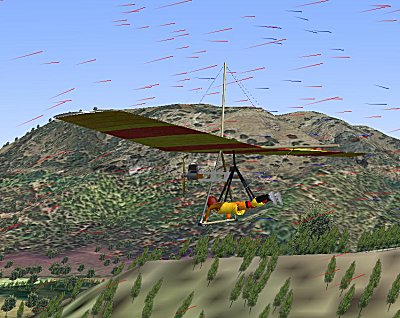
This screen also allows you to adjust current speed and direction, all objects floating on water are subject to this current.
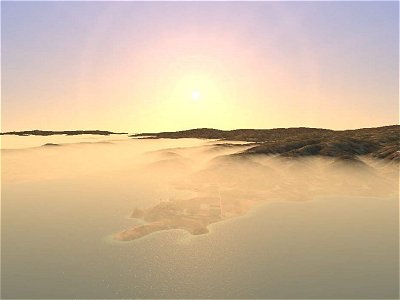
Layered Fog, is one of the most visually pleasing and innovative features in Vehicle Simulator, enable it always if you wish to enjoy a realistic atmospheric view, disable it to make atmosphere simpler with a uniform fog, the altitude at which fog is materializing can be adjusted in the weather dialog, using fog altitude.
Wind Shadows are the effects of wind obstruction between boats usually, when sailing in close proximity of each other, and one boat is upwind of the other, wind may be partially obscured by it, effecting the boat downwind, this option enables this effect and will influence all types of vehicles.
Wind Gusts, enables the turbolence and wind gusts, the actual paramters of wind gust can be found inside the advanced weather options dialog.
CPU idle time, controls how much time you wish the CPU to spend outside of the program, normally to get maximum performance you need to set this time to 0, however you may force the program to give way some of the time and allow other tasks, this slider controls this time and indirectly the CPU load that can be used by the program.
Simulation Step, this is the minimal time step used by the program for each update of its physical simulation, the smaller it is the more stable the calculation will be and the more accurate, however it will also cost more CPU resources, edpecially for multiple vehicles, and multiple collisions and reactions, a typical value for best accuricy will be 5 ms, while for loose accuricy and better speeds, 50 ms is enough.
Press the "Vehicle Options" button to show the vehicle settings, this will show the following screen:
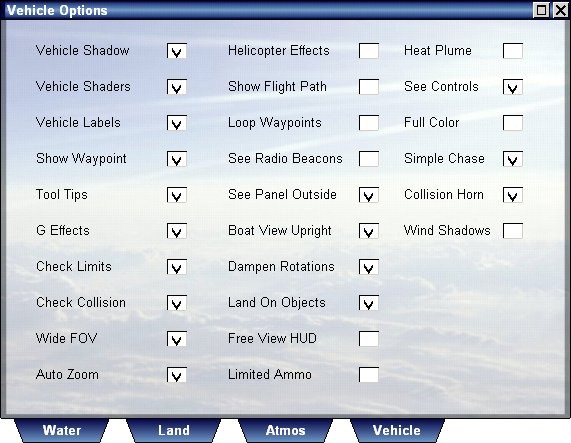
Vehicle Shadow is implemented using several methods, shaders are used for creating soft shadows upon the vehicle itself, inside it, or upon grass and ground at low altitude, high above the ground another method is used, and shadow becomes sharper.
Enable vehicle shadow and vehicle shaders if you wish to see advanced and realistic vehicle view, with reflection, bump maps, and self shadow, however the cost is lower frame rates.


Vehicle Labels, are the small labels that appear on vehicles, these make it easier for you to see where vehicles are and at what distance they are at.
Show Waypoints, this option draw waypoints as rotating 3D objects, and allows you to see them accurately, to increase navigation realism turn this option off.
Tool Tips, are the hints that appear as you press your mouse upon a control or instrument on the panel.
G Effects, are the gray or red screens that appear as you pull your positive or negative g, this imitates the effects felt by pilots pulling positive or negative g and is called blackout and redout respectively.
Check Limits, and Check Collision, these options detect stress and impact on your vehicle and break it when its limits are exceeded.
Wide Fov, this option sets the camera field of view to a normal 45 degree view or a wide 57 degree view, press F7 to toggle this option on/off.
Auto Zoom, tracks your vehicle while tower view is selected, press F6 to toggle this option on/off in tower view.
Helicopter effects, enable this option to make helicopters more realistic to fly, and include effects such as translational lift effect, sink under power and torque, disable this option to make helicopter flight auto coordinated and more enjoyable.
Show Flight Path, use this option to see the path flown by your vehicle in
3D, press Shift P to toggle this path on/off.
Flight path is also visible when you show the replay screen.
Loop Waypoints, use this option to make navigation looping, making your first waypoint active as soon as you reach the last one.
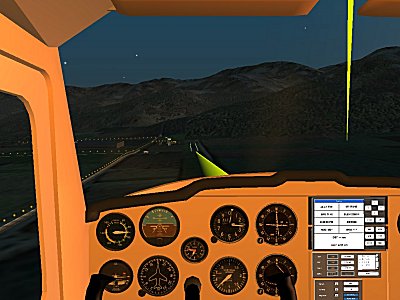
Show Navaids, is a new feature built into Vehicle Simulator, when navigation aids are selected for your vehicle, you can see them visually and learn to navigate by them, these include VOR, ADF, ILS and typically looks like this picture.
See Panel Outside, allows panels of boats or planes to be see when outside of vehicle cabin, however this slows down the rendering a bit.
Boat View Upright, when enabled allows boat view to be aligned with the horison, similar to the tendency of the human head to follow the horizon when the boat pitch and rolls, diabling this option allows better feel of the wave motion but can cause uneasy feeling for the observer.
Dampen Roatations, allows smoother and more predictable motion of boats and other vehicles, but can reduce turning rates, especially when simulation step is large.
Land On Objects, allows the camera and vehicles to detect horizonal object surfaces quickly and not penetrate through them, slow rendering a little and can prevent the camera or vehicle from entering structures such as hangars and buildings.
Free View HUD, when enabled shows the direction of the camera on the HUD, when disabled shows the direction of the vehicle, when working with free view HUD remember that the compass heading is not the direction of your vehicle but the direction of your view.
Limited Ammo, when this option is enabled the amount of cannon shells is limited, the number of stores is limited, and unless you reload will be depleted when fired.

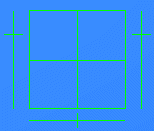
Heat Plume, this option enables heat plume to be seen instead of smoke for jet engines, this option can slow down rendering.
See Controls, this option shows the controls mini panel, on the lower right side of the screen, there you can see the state of elevator, rudder, throttles, and ailerons.
Full Color, this option loads vehicle textures in full color, although smoother to see, it uses more texture memory and might not be suitable for loading very large models.
Simple Chase, when enabled the chase view tracks the vehicle only in yaw and not in pitch, when diabled chase view also tracks in pitch.
Collision Horn, when enabled boats that detect collision course, will sound the horn to warn each other.
Wind Shadows, when enabled will detect wind obstructions between boats and will effect the appearant wind felt on the boat which is downwind of the obstruction.