Adding more vehicles
Adding vehicles can be very simple, all vehicles made for Vehicle Simulator, Micro Flight or Virtual Sailor can be added quickly and without trouble to Vehicle Simulator.
To install add-on vehicles use the following procedure:
Download the vehicles of your choice from these
websites:
http://www.hangsim.com/vsf/planes.php
http://www.qualitysimulations.com/vsf/planes.php
http://library.qualitysimulations.com/library.php
Put the add-on file inside your Vehicle
simulator directory which is typically
C:\Program Files\Vehicle Simulator
Run the add-on file there and let it extract itself.
Run the program and let it complete the import of the new vehicle.
See this page for more information about installing add-ons: http://www.hangsim.com/vsf/howto.php
Organizing the Vehicle Files:
Unlike Virtual Sailor and Micro Flight, Vehicle Simulator can have vehicles organized completely inside a single directory, so for advanced users it is recommended to organize the vehicle so that its panels, instruments and weapons are all inside the vehicle directory.

Description of the Vehicle Structure :
The following section gives basic reference and description of the vehicles of Vehicle Simulator.
Detailed description of vehicle making can be found on http://www.hangsim.com/vsf/plane.php
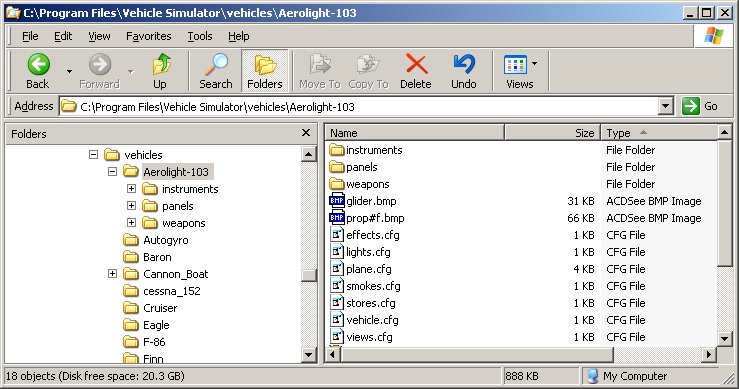
Each vehicle exists inside its own directory under the vehicles directory of the program, inside this directory there are several files that define the structure of the vehicle.
The vehicle configuration file - vehicle.cfg
This file contains the properties of the vehicle, this file can be edited using the properties dialog inside the program, or using a text editor, the file can contain one or more of the vehicle parameters in any order you wish to have, the full list of parameters allowed in this file is given in the table below:
| [type] - type of vehicle hang_glider - hang glider para_glider - para glider ultra_light - ultra light ( light plane ) glider - glider ( plane without engine ) airplane - airplane ( fixed wing airplanes ) trike - microlight ( powered hang glider mounted on wheels ) paraplane - paraplane ( powered paraglider mounted on wheels ) autogyro - auto gyro ( free rotatiing rotor with after propeller ) helicopter - helicopter ( powered main rotor with tail rotor ) automobile - car or land vehicle boat - boat ( powered boat without sails ) submarine - submarine ( submersible without sails ) balloon - hot air balloons and dirigibles [mass] - mass of vehicle (kg) [crew_mass] - mass of boat crew (kg ) moves with point of view and effects boats weight and balance. [has_catamaran] - boat is catamaran or not ( 1 or 0 ) [pilot_name] - name of animated pilot to use [eject_name] - name of ejection parachute to use [wing_sur] - wing area (m^2) [wing_span] - wing span (m) [wing_dihedral] - wing dihedral angle (rd) [wing_height] - wing height above cg (m) - [hang glider, trike] [wing_al0] - wing install angle (rd) [wing_alm] - wing stall angle (rd) [wing_cla] - wing lift line slope (cl/rd) [wing_cd0] - wing zero incidence drag coefficient [wing_cdi] - wing induced drag coefficient [cd_flaps] - added drag coefficient with flaps fully extended [al_flaps] - added AOA with flaps fully extended [cd_spoilers] - added drag coefficient with spoilers fully extended [al_spoilers] - added AOA with spoilers fully extended [cd_gear] - added drag coefficient with gear fully extended [body_area] - body cross section area (m^2) - [gyro, helicopter, car, boat] [body_cd] - body drag coefficient - [gyro, helicopter, car, boat] [cockpit_size] - size of shadow area around cockpit (m) [scale_factor] - scale factor - use 0.3048 to convert model from ft to m [auto_pilot_gain] - auto pilot gain factor of control ( 0 to 1 ) to reduce turn rates use smaller values. [boat_length] - boat waterline length (m) [boat_alt] - boat draft, height of waterline above keel, (m) [boat_cgy] - height of boat CG above waterline (m) [hydro_cruise] - cruise speed of boat with hydrofoils (kt) use 0 for
boats without hydrofoils. [clmax_sailb] - maximum lift coefficient allowed for main sail of
boat ( 0 - 5 ) for square rigger use small values. [has_sails] - boat has sails or not (1 or 0) [sur_sailb] - area of main sail of boat (m^2)
[max_g] - maximum g load (g) [doors_angle] - angle of swing doors rotation (rd) [thrust_angle] - angle of thrust vectoring for boats with outboard
engines ( attach_props = 1) |
The vehicle mesh file - vehicle.x
This file contains the 3D model of the vehicle itself, including its moving parts, any moving part you wish to have, should be named according to the following list of tags, the parts should have their axes defined according to actual rotation axis for this part.
The program seeks also other names of files for compatibility, possible names are plane.x, boats.x, body.x.
The program supports also one optional LOD file which is used when the vehicle is far from the observer, this file is called simple.x.
The program supports also one optional DAMAGE file which is used when the vehicle is broken, this file is called broken.x.
The program supports also one optional LIGHTS file which is used for glowing parts at night, this file is called lights.x.
The program supports also one optional ANIMATED file which is used for animated parts, this file is called anim.x.
The program supports also one optional GEAR file which is used for landing gear, this file is called gear.x.
For paragliders only the program loads also an animated mesh file called wing.x.
The vehicle mesh files are searched for moving parts, part names are identified accoring to name tags, each name is asscociated with a moving part and a specific function, the following table shows the possible name tags and their functions.
elevatorl - left elevator elevatorr - right elevator elevatorm - middle elevator elevatort - rear elevator rudderl - left rudder rudderr - right rudder rudderm - middle rudder ruddert - rear rudder aileronl - left aileron aileronr - right aileron ailerontl - left aileron ailerontr - right aileron elevonl - left elevon elevonr - right elevon stickl - left stick stickr - right stick wheell - left control wheel wheelr - right control wheel stwheel - left boat steering wheel stwheer - right boat steering wheel spropl - left prop spropr - right prop fpropl - fast left prop fpropr - fast right prop srotorl - left main rotor frotorl - fast left rotor strotorl - left tail rotor ftrotorl - fast left tail rotor srotor - main rotor frotor - fast main rotor
srotorr - right main rotor
strotor - tail rotor
strotorr - right tail rotor
strotorl - left tail rotor
pedalr - right pedal
pedaltr - right pedal thrott - trottle handle
spoill - left spoiler
spoiltl - left spoiler sproptr - tip right prop
vtaill - left V tail |
Additional files inside the vehicle directory are optional and include the following files:
effects.cfg - this file defines effects applied on parts inside the vehicle mesh and attached weapons, even line contains a partial name to be searched in the mesh, and reflection and bump scale to be applied on this part.
lights.cfg - this file defines the position and type of lights attached to the vehicle, these include the navigation lights, landing lights and other types you wish to have.
smokes.cfg - this file defines the position, size and color of smoke source attached to the vehicle, these smoke sources emit smoke according to throttle settings.
views.cfg - this file defines the positions of camera views inside the vehicle, these views can be selected, defined and saved using the views dialog inside the program.
elements.cfg - this file defines the positions and properties of simulation elements that compose the vehicle, when this file exists its properties override the properties found in the vehicle configuration file, the elements file can be created, edited and saved using the elements dialog inside the program.
components.cfg - this file defines the positions and properties of components that compose the vehicle, when this file exists its properties override the properties found in the vehicle configuration file and those found in the elements file, the components file can be created, edited and saved using the components dialog inside the program.
smokes.cfg - this file defines the position, color and size of smoke sources emitted from the vehicle.
trails.cfg - this file defines the position and size of smoke trails emitted from the vehicle when flying in foggy areas.
Any vehicle not having elements or components exposes its properties for editing, to edit vehicle properties select the vehicle, and then press the Design tab in the vehicle dialog, the following dialog will appear on the right side of the screen.
 |
On the top part of the dialog appears the selected
vehicle, below appears a list of its properties.
To edit each property select it from the list box and then edit the value in the text box below, click Apply to change the property. Any property can be edited while vehicle is in flight and the result is felt immediately, this can be used to fine tune the dynamic characteristics of your vehicle and to give you important engineering insight about the effect of this property. To revert to saved properties press Load Properties. To save your work press Save Properties. To revert to original properties for this vehicle press Restore Properties. The changes you make are saved at the end of vehicle configuration file, when you restore the properties you delete these values from the file.
|
Any vehicle is composed of elements, these include:

These elements are created by default for any type of vehicle, but are not exposed or editable until you save them for the first time from the elements dialog.
Any vehicle without components defined can have editable elements, elements can be created using the elements dialog and pressing Save Elements.
Press the Elements tab to edit elements, the following dialog will appear on the right side of the screen.
 |
On the top part of the screen appears the list of
elements for the selected vehicle, any element has properties which you
can edit and position you can change.
Any element can have a control associated with it, for example a wing can have aileron, elevator, rudder, flap, and more. This control is taken from joystick, keyboard or mouse and functions as it does for standard vehicles. To edit element property select the element from the top list, then select the property from the lower list, then change the value and press Apply. Changing the x,y,z will move the element, and you will see it visually moved on the vehicle itself. The slider helps you move the element or orient it in yaw, pitch and roll. When you select some properties such as control and type a combo box appears instead of the edit text and allows you to select the type. Elements can be added and deleted at will, and also changed in-flight, this can be used to create a precise representation of your vehicle and to give you insight about the function and purpose of each part of the vehicle. To add a new element scroll down on the top list to find a list of [new element] types, select the type you wish to add and press Apply, then edit its position and properties using the lower list and test box. Press Save Elements to create editable elements for vehicle without elements, or to save your work. Press Load Elements to load elements file, and undo your changes. Press Delete Elements to delete the elements file and switch to standard vehicle type.
|
Editing the body element
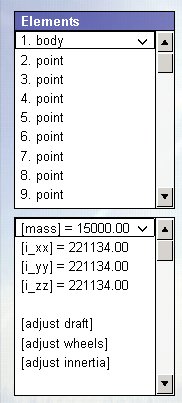 |
When you select the body element of the vehicle you
can change the mass and inertia of the entire vehicle.
You can also change the buoyancy and flexibility of the wheels of the vehicle, instead of changing point by point and wheel by wheel. To change the properties of the entire vehicle select the mass first, set it to desired value and press Apply. Select the [adjust inertia] and press Apply, this will calculate the inertia of the vehicle based upon its dimensions and mass. For planes press [adjust wheels], then press Apply, this will adjust tension on all wheels at once. For boats press [adjust draft], then enter the value for the desired draft of the boat into the text box below and press Apply, this will adjust the buoyancy for all points of boat at once.
|
Simulation elements are responsible for the forces acting upon the vehicle, and for control inputs upon it, but they do not have physical appearance because they are defined in addition to an existing vehicle shape.

The most intuitive concept in vehicle design is vehicle components, these are physical mesh parts with elements attached, these are defined inside the components directory of the program and consist of three files for each component name:
Vehicle with components does not load the default vehicle mesh file, it requires only vehicle configuration and components file to define the vehicle type and shape.
Press the Components tab to edit components, the following dialog will appear on the right side of the screen.
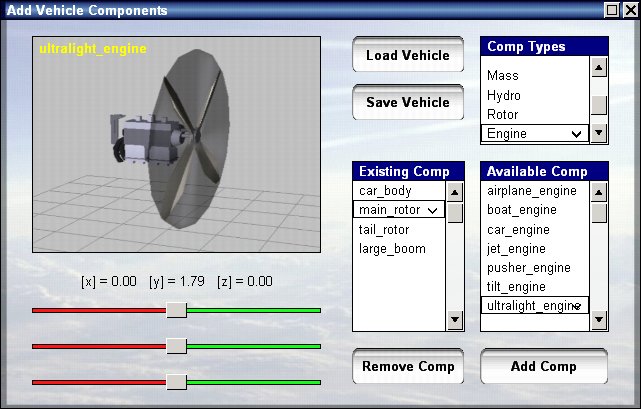
It is recommended to add the body component first as the other components are attached to it, but in case you need to replace the body this component can be deleted and added again.
The body component includes also the panel, camera and pilot data typical for this body, selecting this body will select also its panel and pilot and position your default point of view.
To add a new component select the component type then the actual component and press Add Component.
To delete a component select the component and press Delete Component.
Components can be added, deleted and changed in flight to see their effect on the vehicle behavior.
To change the position of components select the component from the top list, select the x,y,z position and move the slider to move the component in that direction.
To save your work press Save Vehicle.
New components can be made and put inside the components directory, allowing the user to create his own vehicles using interesting combinations of existing parts.
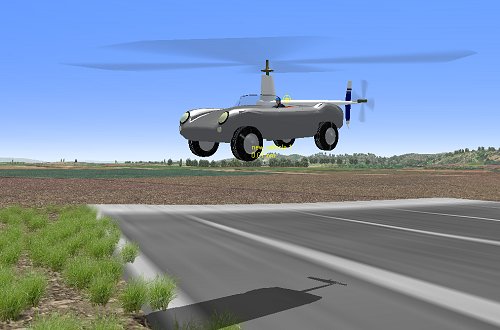
The most impressive feature of Vehicle Simulator is its ability to create a prototype vehicle, this is made possible using vehicle components and the design mode built into the program, allowing the components to be quickly assembled and edited on the fly.
You can change the compoenents position, and and remove components and see the effect it has on vehicle daynamics, this makes the program an unparalleled educational and engineering tool.
To create a new vehicle, make sure no vehicle is selected, if you have a
vehicle selected remove it from scene before you proceed.
Select the vehicle dialog using Change - Vehicle or
press V, then press on the Design tab to show the vehicle design dialog.

On this dialog, you select first the type of vehicle to create and select its body first, for example let's create a flying car.
Selecting "Automobile" as the type, and then "Car_body" as the body type, then press next.
Now we see the new vehicle from the outside, and also the components editing dialog.
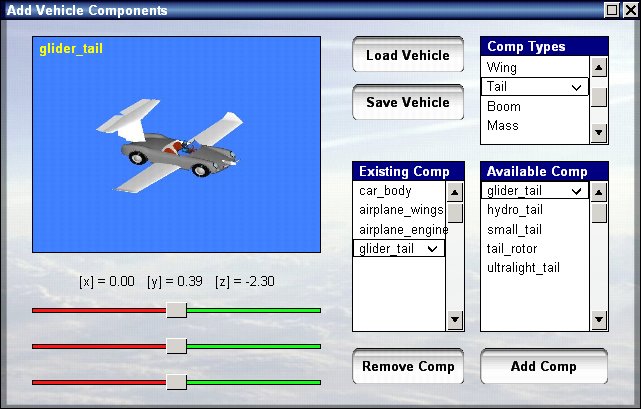
Selecting the wing type, we add airplane wings and press Add Comp, this will add the wings components, and we can change the position of this component using the x, y, z sliders on the left side of this dialog.
After adding also an airplane engine, and a glider tail, we press "Save Vehicle" to save our completed creation, the new vehicle is always saved under the name "new_vehicle", if we are happy with this vehicle we can raname this directory later to any name we want, for example rename the "new_vehicle" to "flying_porche.
Note: Legal vehicle name must not include space inside it, use undescore instead, "new_vehicle" is ok "new vehicle" is not.

Now we are ready for the flight testing, press Escape to close this dialog, and press E to start the engine, B to release brakes, then set full throttle and let the car take off, pulling slightly on the control column.

Our Vehicle is can be accessed and edited using the "New_vehicle" from the vehicle selection dialog.
Multiple combinations can be created and tested, with great joy of experimentation, for example selecting our vehicle we can press the design tab, and get directly to the components editing dialog.
Then we can remove the engine, wings and tail, and add helicopter rotors instead, or a boat engine and and surfaces, and whatever our imagination can create, after each change, do not forget to save the vehicle or the last changes will not be saved.
